There’s something about the simplicity of a bun, isn’t there? Soft, warm, and pillowy, like a little bite of comfort. When I was growing up, I remember my mom making these fluffy, homemade buns from scratch on a Sunday afternoon, the aroma filling the house, letting us know that something wonderful was on its way. As I grew older and became more aware of my diet, I started exploring vegetarian alternatives. That journey led me to develop this vegetarian buns recipe, which takes all the warmth and love of those childhood memories but adds a little modern twist.
The best part about this recipe is how adaptable it is. You can make it your own, whether you’re looking to serve them alongside a hearty soup, turn them into a meal with some plant-based fillings, or just snack on them straight out of the oven. There’s a magic to this bun that feels timeless, but with a fresh, plant-powered perspective. So, let’s get our hands into some dough and create something really special!
Vegetarian Buns Recipe
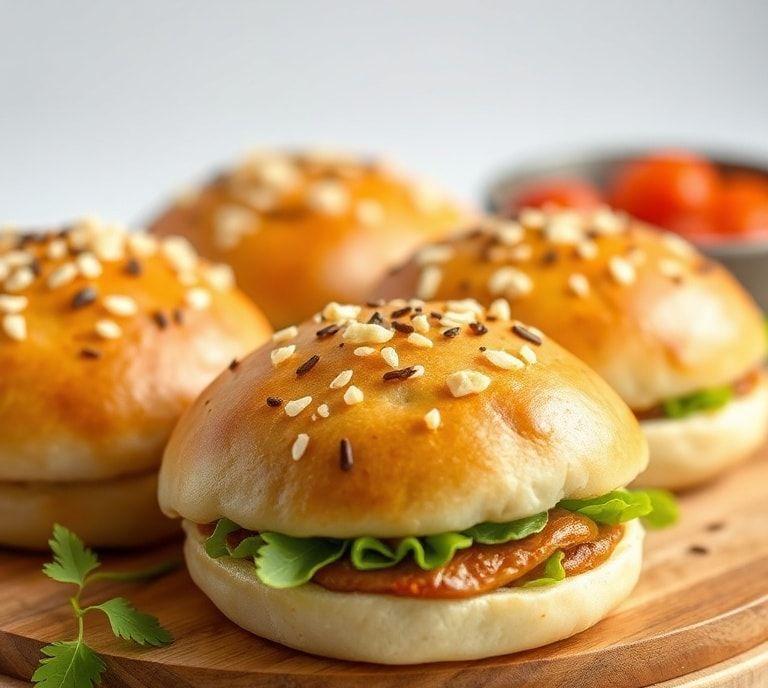
Now, don’t be fooled by the simplicity of this recipe. While the list of ingredients may look humble, the result is anything but. These vegetarian buns are fluffy and slightly sweet, with just a hint of savory warmth in every bite. The texture is key-soft and airy on the inside, but with a golden, slightly crisp outer layer. Whether you’re vegan, vegetarian, or simply looking for something new to try, these buns will win you over.
Ingredients Needed
To create this soft, chewy masterpiece, you don’t need a whole lot, just a few basic ingredients. Here’s what you’ll need:
- 3 cups all-purpose flour: The base of your buns. Make sure to sift the flour before using it, so it’s light and airy.
- 1 tablespoon sugar: This little bit of sweetness gives the buns just the right touch of flavor.
- 1 teaspoon salt: Salt is essential to bring out all the flavors in the dough.
- 1 tablespoon instant yeast: The secret to that soft, fluffy texture. Instant yeast works faster than active dry yeast, so you don’t have to wait as long.
- 1/2 cup warm water: The perfect temperature for activating the yeast, not too hot or cold-around 110°F is ideal.
- 1/4 cup olive oil (or vegetable oil): This gives the buns richness and tenderness. You can experiment with other oils like coconut or avocado for a twist.
- 1/4 cup plant-based milk: Any milk alternative works here-soy, almond, oat-whatever you prefer. It adds a bit of creaminess to the dough.
- 1 tablespoon apple cider vinegar: This little tang helps to activate the yeast and gives the buns a bit of a lift. It’s a great trick I’ve picked up over the years.
- 1 tablespoon sesame seeds (optional): For sprinkling on top for a bit of texture and crunch. You can skip this if you prefer plain buns.
Cooking Instructions
- Prepare the yeast mixture: In a small bowl, combine the warm water, sugar, and instant yeast. Stir gently and let it sit for about 5-10 minutes, until the yeast is frothy and bubbly. This means it’s activated and ready to go.
- Mix the dry ingredients: In a large mixing bowl, whisk together the flour and salt. I like to use a whisk because it helps aerate the flour and keeps the dough light.
- Add the wet ingredients: Pour the yeast mixture, olive oil, plant-based milk, and apple cider vinegar into the dry ingredients. Mix everything together until it forms a sticky dough.
- Knead the dough: Transfer the dough to a lightly floured surface and knead for about 8-10 minutes. The dough should become smooth and elastic. Don’t worry if it’s a little sticky at first; just keep kneading until it’s a nice, soft ball.
- Let the dough rise: Place the dough in a greased bowl, cover it with a clean kitchen towel, and let it rise in a warm place for about 1 hour, or until it doubles in size. This step is magic-watching the dough puff up is like seeing the potential in your food come to life.
- Shape the buns: Once the dough has risen, punch it down gently to release the air. Divide the dough into 8 equal portions (or more if you want smaller buns). Roll each piece into a smooth ball, placing them on a lined baking sheet. Be sure to leave some space between them as they’ll expand during baking.
- Second rise: Cover the buns with a kitchen towel and let them rise again for about 30 minutes. During this time, preheat your oven to 375°F (190°C).
- Bake: Once the buns have puffed up, brush them lightly with a little extra plant-based milk for a golden finish. Optionally, sprinkle sesame seeds on top for added crunch. Bake for 15-20 minutes, or until they’re golden brown and sound hollow when tapped on the bottom.
- Cool and enjoy: Allow the buns to cool for a few minutes before serving. The aroma in the kitchen is the best part!
Ingredient Science Spotlight
Let’s pause for a moment and dive into the science of these buns. It’s always fascinating to me how these simple ingredients come together to create something so delicious.
- Yeast: The yeast is the star of the show here. When activated, it feeds on the sugar in the dough and produces carbon dioxide, which causes the dough to rise and become light and airy. The acid in the apple cider vinegar helps the yeast along by creating a slightly acidic environment, making it easier for the yeast to do its job.
- Flour: All-purpose flour is a great choice here because of its balance of protein content. It creates a structure in the dough that holds up during rising and baking. The gluten formed from the flour’s proteins gives the buns their chewy texture.
- Oil: The olive oil contributes not just to the flavor but also to the dough’s tenderness. It coats the flour proteins, preventing them from forming too much gluten and resulting in a softer texture.
Expert Tips
- Don’t rush the rise: The most important step in this recipe is the rising process. Give your dough enough time to puff up-if you rush it, your buns may turn out denser. Find a warm, cozy spot for the dough to rise, like near a radiator or in a sunny corner of the kitchen.
- Use a kitchen scale: If you’re serious about getting the best results, a kitchen scale can be a game-changer. It helps ensure you’re using the right flour-to-liquid ratio, which is key to perfect dough.
- Brush with a little oil: To get that beautiful, golden-brown color on top, brush the buns with a bit of olive oil or plant-based milk before baking.
- Experiment with fillings: If you want to take your buns to the next level, try filling them with your favorite vegetarian fillings before baking. A little sautéed spinach and vegan cheese or roasted veggies would make a lovely addition.
Recipe Variations
- Herb-infused Buns: If you’re craving a bit more flavor, add some finely chopped fresh herbs like rosemary, thyme, or basil into the dough for an aromatic twist.
- Sweet Buns: To turn these into a sweet treat, you can add cinnamon, nutmeg, or even a bit of orange zest into the dough. Top them off with a simple glaze made from powdered sugar and a splash of plant-based milk.
- Stuffed Buns: Feeling adventurous? Add a filling like sautéed mushrooms, onions, and spinach, or maybe a plant-based ’meat’ mix. Shape your buns around the filling and bake them for a savory, handheld treat.
Final Words
Buns are such a humble food, yet they hold so much potential. They’re simple, versatile, and comforting, but with just a few tweaks, you can transform them into something extraordinary. Whether you enjoy them as a side, use them for burgers, or simply dip them in a little vegan butter, these vegetarian buns are the perfect foundation for endless culinary creativity.
FAQs
What Ingredients Are Typically Used In Vegetarian Buns?
Vegetarian buns usually include all-purpose flour, yeast, sugar, salt, water or milk, and a small amount of oil or butter. The filling can vary widely and often includes vegetables such as cabbage, carrots, mushrooms, and bell peppers, along with tofu or paneer for added protein. Seasonings like soy sauce, garlic, ginger, and herbs are commonly added to enhance flavor.
How Can I Make Vegetarian Buns Soft And Fluffy?
To achieve soft and fluffy buns, it is important to knead the dough thoroughly to develop gluten, which provides structure. Allow the dough to rise in a warm, draft-free area until it doubles in size, usually 1 to 2 hours. Using warm milk instead of water, and adding a small amount of sugar to feed the yeast, can also improve softness. Finally, do not overbake; remove the buns when they are lightly golden for a tender texture.
Can I Freeze Vegetarian Buns For Later Use?
Yes, vegetarian buns can be frozen either before or after baking. To freeze before baking, shape the buns and place them on a tray to freeze individually, then transfer them to an airtight container or freezer bag. To freeze after baking, allow the buns to cool completely, then wrap them tightly in plastic wrap and store in a freezer bag. Reheat in a steamer or oven to restore freshness when ready to eat.